Compression
Compression definition: Compression is a decrease in dynamic range.
Dynamic range definition: Dynamic range is simply the difference between the loudest and quietest parts of any sound or audio signal. Why would we want to decrease dynamic range? Well, so we can hear the quiet parts of our song productions, and the loud parts aren't too loud.
Have you ever been listening to something and you can't hear it well enough? So you turn it up and then the loud part blasts your eardrums? Well, we compress to avoid that.
In the same way, compression is useful on individual instruments. Some parts of a guitar track might be too quiet, and get lost behind the keyboards, which go up in level in those same parts of the song. Compression can help raise the level of the quiet guitars parts, and lower the loud parts of the keyboard tracks.
Dynamic Range In Acoustic Sounds vs Recorded Sounds
You see, real instruments; voices, drums, guitars, keyboards, vocals, percussion, strings and such, can be very dynamic in real life. But in recordings, we have less dynamic room to play with.
The dynamic range of recorded music runs from about 6dB (EDM) to about 32dB (the high end of dynamic range for classical recordings), according to Yamaha (makers of P.A. systems, musical instruments and other audio equipment, as well as motorcycles).
The following chart compares apples to oranges, a bit. The point is that our ears and live music sources have a lot more dynamic range than recorded music.
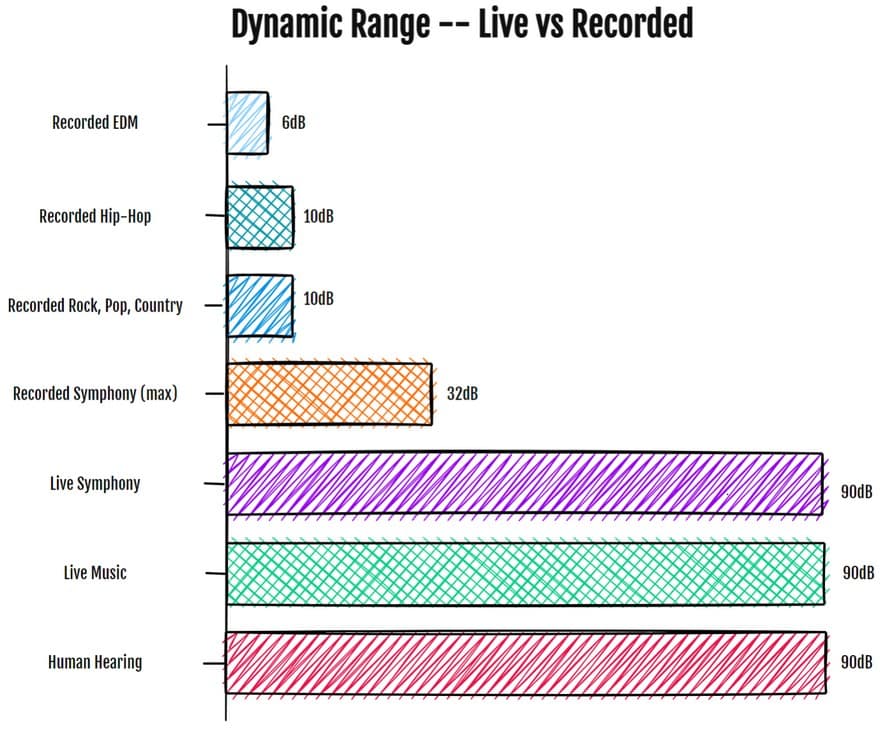
Dynamic Range: Live vs recorded music
The dynamic range of a live symphony orchestra might be 90dB. How do you get that dynamic range down to 32dB or less for a recording? Compression! And it's similar with other types of music.
The dynamic range of human hearings is about 90B (from 30dB SPL, to 120dB SPL, or what's called the threshold of pain). So, we've got to squeeze that 90dB down to between 6db and 32dB. One way we do that is through compression.
So compression is a technique used to decrease dynamic range. It's typically used to bring the quiet parts of a signal up in level, so they don't get lost.
Dynamic Range, The Loudness Wars, & How To Get Your Mixes To Compete On Spotify & YouTube
A quick note -- there is another form of compression involving audio -- data compression. When we create an mp3 file, the data is compressed in order to make for a smaller file size. We're not talking about data compression here.
Compressor Controls

An 1176 style compressor, with no threshold control
On most compressors, you'll see the following controls . . .
- Threshold: Determines the level at which compression starts to work. When sound goes above this level, compression kicks in.
Sometimes you'll see compressors without a threshold control. They usually have an input level control instead. In this case, the threshold is fixed, and the input gain determines whether your signal will reach the threshold or not. - Ratio: Determines how much the sound is reduced once it goes above the threshold. For example, a 4:1 ratio means that for every 4dB above the threshold, the signal level is reduced to 1dB above the threshold.
- Attack: Sets how quickly the compressor responds when the sound exceeds the threshold. A fast attack reduces the initial sound impact, while a slower attack preserves it.
- Release: Determines how long it takes for the compressor to stop reducing the sound once it falls below the threshold. A shorter release restores the sound quickly, while a longer release maintains the compression effect and may add sustain.
- Makeup Gain Or Output: Amplifies the compressed sound to compensate for any volume loss caused by compression.
Compression: Threshold, Ratio, Attack, & Release
These are the main controls you'll find on most any compressor. Here are some additional parameters you may or may not find on a compressor, depending on the model.
- Lookahead Compression: There's something we can do with DAWs (digital audio workstations) that was difficult to do back in the tape days, with hardware units. It's called lookahead compression. With a hardware unit, the signal runs through resistors and capacitors and then the compressor reacts to the signal. The circuits are fast, but not instantaneous. But with software and recorded signals, we can look ahead and see what's coming. We can even apply compression just before the signal becomes audible. Lookahead compression is useful for sounds with fast appearing transients, such as a snare drum.
- Compression Knee: Soft Knee vs Hard Knee
The compression knee controls how gradually the compressor goes from no compression, to the full compression ratio. If you have a compressor set for a 4:1 ratio, with a threshold of -10dB, and a hard knee, any signals above -10dB will be compressed at 4:1. With a soft knee, the compression comes in more gradually. When aiming to rapidly control a signal's transients, hard knee compression might be the better choice. Conversely, if you want to gently tighten up or glue a mix, a soft-knee compressor could be the preferred option. - High-Pass And Low Pass Filters In Compression
Some compressors have high pass and low pass filters built in. These filters dont affect the tone of the sound, they affect the compressor's trigger.
Let's say you have a signal with a lot of low end, maybe a bass guitar, with slapping going on. And the slapping and popping jump out a bit too much. So, you don't want the compressor's threshold being triggered by the low end of the bass -- only the slapping. So, you use the high pass filter. This allows only the high frequencies to pass through to the threshold control. It tells the compressor to ignore low frequencies, and only compress when the high frequencies are excessive. The compressor turns down the whole signal, but only during the slapping and popping.
The low pass filter tell the compressor to trigger the threshold based on the low information coming into the compressor. - Auto Make-Up Gain: Some compressors will take a stab at making up any gain the compressor might have reduced, with an auto makeup gain function.
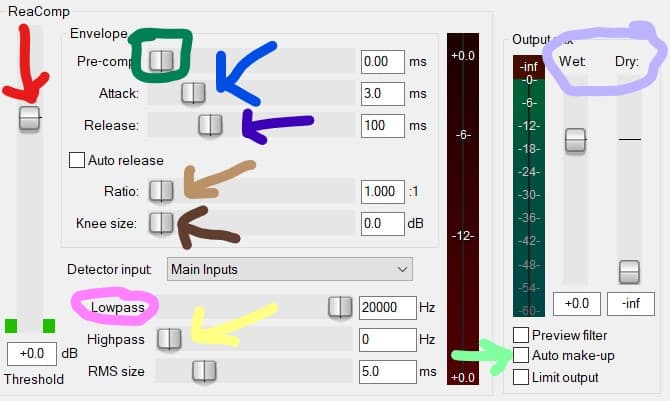
ReaComp with threshold, ratio, attack, release. precomp, high pass, low pass, knee, auto make-up gain, and wet/dry controls shown.
Compressor: How To Use It
So, in a nutshell, when you put a compressor on a signal, you can do the following.
- Set the threshold or input gain to where the compressor triggers when signals are too loud.
- Adjust the ratio until you get a good level of gain reduction.
- Adjust the attack time to control the attack of the signal (for instance, if you want the initial crack of a snare drum to come through, slow the attack time until you can hear it how you like).
- Adjust the release time for sustain, if needed (common for toms)
- Adjust the makeup, or output gain until the signal sounds about as loud as it did before.
- Collect your Grammy for audio engineering.
Compression As An Effect
Some compressors have a characteristic sound. And some ways of compressing affect the sound drastically and can put compression more into a sound effect category and less about controlling dynamic range.
Compression For Vocals And Instruments

It's far more important for you to understand what the controls of a compressor do, and how they affect the sound, than to memorize compression settings for different instruments. After all, a vocal or a guitar can be percussive or smooth, and different musicians use their instruments differently.
That being said, here are some general guidelines for compressing various instruments and vocals. FYI, don't let these guidelines stop you from doing something completely different.
Vocal Compression
A common technique with vocals is to use two different compressors. The first compressor will have fast attack and fast release times. It's job is to catch any peaks in the sound. The second compressor in the chain will have a slower attack and release time. Its function is to smooth out the overall volume of the vocal track. Two common compressors for this technique are the 1176 and the LA-2A. There are lots of plugin emulations of these compressors.

An LA-2A type compressor from Tukan -- the LA-2KAN
Guitar Compression
Guitar can range from clean and wildly dynamic, to heavily distorted and even sounding. So there's no, general "this is how you compress guitar" settings. The best advice I can give you is to know why you're compressing. That will determine what kind of compression to apply, if any.
Are you compressing for effect, so that your clean guitar sounds like an '80s ballad? Are you compressing to add beef to a distorted guitar track? Is there a funk track and you want to tame the transients?
These all require different compression settings.
Compressing Clean Electric Guitar
When compressing electric guitar, a lot depends on the track and what you're going for. Is it percussive, and you want a Mark Knopfler, highly compressed sound? Is it a chug-chug on power chords on the low strings. Is it slow strums?
As a general guideline, clean guitar is more dynamic than distorted guitars, so you might tighten it down a bit more to control the levels.
As with any sound source, if you want to control the initial transients, a fast attack time is necessary. If you want sustain, slow the release time down and compress more heavily.
Compressing Distorted Electric Guitar
Distortion compresses guitar sounds. Compression on distorted guitars is often fairly light, for this reason.
Punch for distorted guitars: You might want to add some punch on heavier guitars to make them sound beefy, thick, and powerful. Start out with an fast attack time, and then roll it back until you hear the initial transients come through. 20-40ms is often where I end up. Then dial your release time to fit the content. 100ms is a good starting point.
A low ratio, with 2-3dB of gain reduction works.
Compressing Acoustic Guitar
Acoustic guitar, when strummed, can be a very percussive instrument. Make sure your attack time is slow enough to let the percussiveness through, if that's what you're after.
Arpeggios are a different kettle of fish. Consider a longer release time to add sustain, and a higher ratio.
Bass Guitar Compression
Bass guitar compression is usually meant to even out the low end and make it more consistently present. A bass guitar might be more resonant on certain notes. Plus, the low end might drop out some on higher notes.
A 4:1 ratio is a good place to start. Lower the threshold until you get 4dB-6dB gain reduction. Adjust the output level to match the pre-compressed level. Listen to see if you low frequencies sound more stable.
Depending on the aggressiveness of the track, dial the attack back until you can hear the pick attack or finger attack on the non-fretting hand. Dial the release until you're sure compression won't interfere with the next note, but you get the sustain you want.
I sometimes use multi-band compression to really dial in the low end.
Drum Compression
Drum compression is the same deal as everything else 🙂
You may want to make the drums punchier and/or add sustain. Take a compressor and dial in 2dB-3dB of compression. Level match with the output and see if it's thicker and punchier. Dial the attack until the right amount of initial transients come thorough. Adjust the release for sustain.
Parallel compression (also called New York compression) is often used on drum buses.
Bus Compression
A bus is when several channels or tracks are mixed together. For instance, multiple microphones on a drum set can be recorded individually, and then combined in a drum bus. Instruments may have their own bus and vocals too. These buses get mixed together to the mix bus (sometimes called the master).
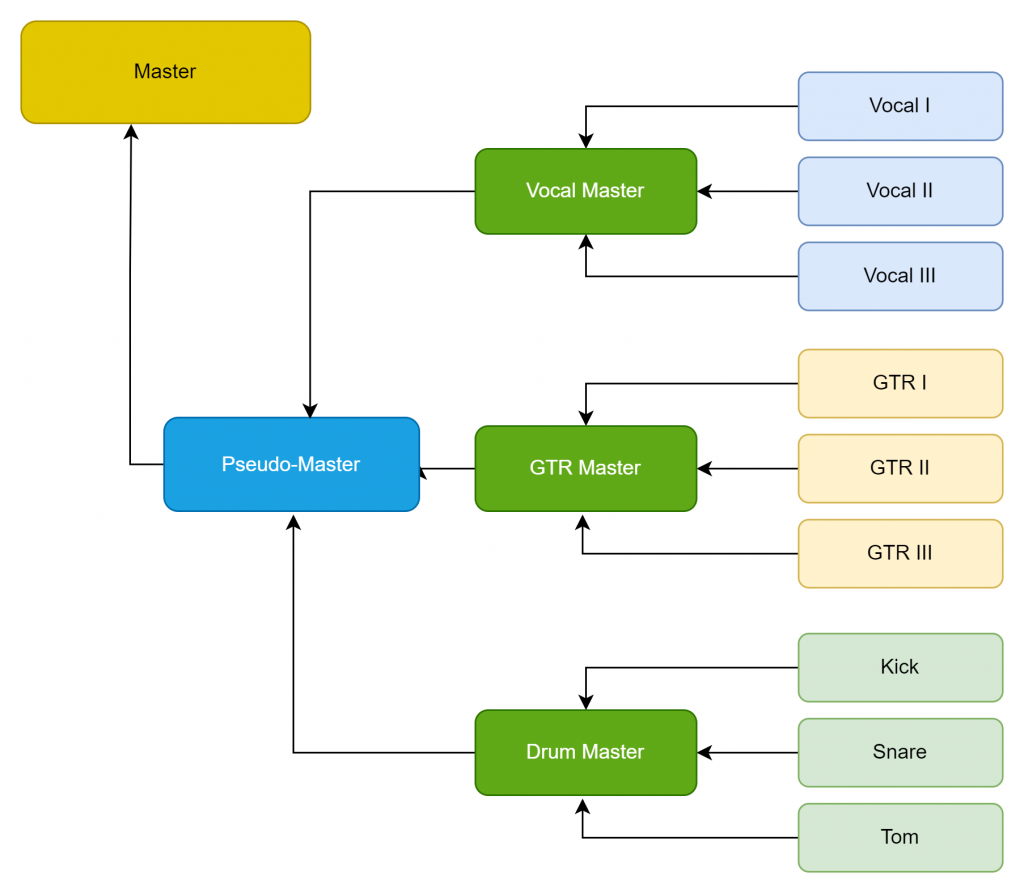
You can compress drum buses, instrument buses, vocal buses and the mix bus. Mix bus compression blends elements, adds cohesion (sometimes referred to as 'glue'), and controls overall sound. It enhances loudness and brings out details for a unified sound. Use a moderate ratio with gentle attack times and release times.
Advanced Compression Techniques
Parallel Compression
Compression can help control dynamic range and make sounds punchier and more sustained. But compression can also take some of the life out of a sound -- making it flat, squashed, and uninspired. Parallel compression seeks to overcome the drawbacks of compressed an uncompressed signals by blending an unaffected, 'dry' signal with a heavily compressed signal.
Parallel compression: combines heavily compressed and uncompressed signals for a balanced and powerful sound. Create a separate bus for compressed signal, blend it with the uncompressed signal. Adjust the blend for desired effect. Alternately, you can use a compressor with a mix control to blend the compressed and non compressed signals.
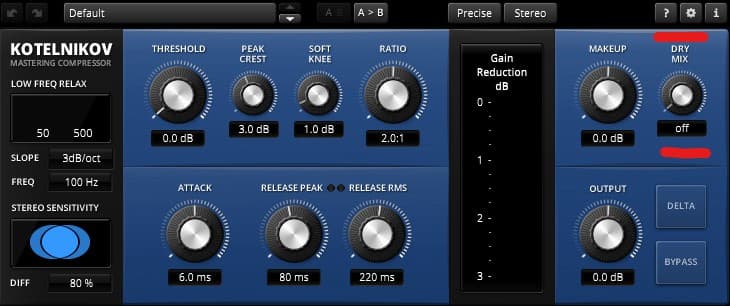
Kotelnikov compressor with mix control, for parallel compression
Sidechain Compression
Sometimes you have two instruments playing at the same time and it makes it hard to hear both of them. Two examples come to mind: Bass drum and bass guitar, and narration over music. Let's look at them one-by-one.
Example: Kick Drum and Bass Guitar -- Let's suppose you have a bass line playing on 1/8 notes and a kick drum that comes in less often. Your having trouble hearing the kick drum over the bass guitar. If you turn the bass guitar down, the song loses power. What you'd like to do is turn down only the bass notes that occur when the kick drum hits. Then, you'll be able to hear the kick and the song will still sound powerful. Sidechaining compression can do this.
Example: Vocal and narration -- now, let's suppose you've got Morgan Freeman narrating your documentary on potato bugs. You've got a nice music background track, but you want it to back off a bit when Mr. Freeman is speaking, and come up a bit when he's not speaking. Sidechaining can do this.
Sidechain compression: uses one signal's level to control compression of another.
Ducking: Sidechain compression is also called "ducking" because it temporarily lowers one signal (e.g., background music) when another (e.g., vocals) becomes prominent, creating space and clarity.
Here's how it works. You put the compressor on the instrument you want to turn down. But you trigger the compression (gain reduction) with the instrument you want to come through more clearly.
In other words, the compressor is on the bass guitar, but it only compresses the bass guitar when the kick drum hits. Or, the compressor is on the background music, but it only compresses when Morgan Freeman talks about potato bugs.
Multiband Compression
A standard compressor compresses the whole signal. It's sort of like an automated volume control. But what if you want to compress some parts of the frequency spectrum differently than others? What if you want the low end of a mix to be more solid and consistent, and the low mids are just right for most of a song, but it gets a little muddy when the level is to high in other parts of the song? What if you want the high end to be more present, but not harsh?
Well, you can set different compression settings of each of these frequency bands, with a multi-band compressor.
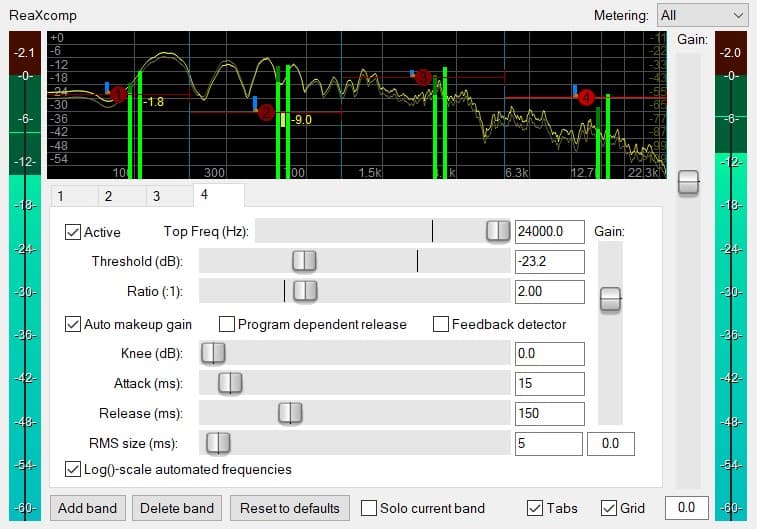
ReaXcomp Multi-Band Compressor
Multiband compression: divides audio into frequency bands for individual compression. It addresses frequency-related issues and applies different compression to different parts of the frequency spectrum.
Frequency-Dependent Compression: Multiband compression is also known as "frequency-dependent compression" because it applies different compression settings based on frequency content.
Gain Staging In Compression
Gain staging in compression (and in audio production in general) is easy. You simply roughly match the level of a signal going into the compressor, with the level of the signal level coming out. If the compressor is taking a maximum of 6dB off the top of the loudest parts of a track, you'll probably find your gain output control somewhere around +4dB to +6dB.
Just take a section of the song in which the compressor is actively compressing and listen with the compressor bypassed and then on. Use the makeup gain control to match the levels between the two states.
Pumping And Breathing -- What Are They?
Pumping and breathing are artifacts of heavy compression.
Pumping: When you compress a sound a lot, you may hear the sound start, then the compressor clamps down and drops the level, then after the release time the sound level comes rushing back. When you can hear this rise and fall in volume, it's known as pumping.
Breathing: If there's a lot of hiss, or background noise on the track, you may also hear the noise rise and fall opposite the compression. When gain reduction is high, the noise is low. When the compression releases, the noise comes up. This noise going up and down is called breathing. Breath sounds may also be too loud, as the compressor might be acting more strongly on the sung parts and de-emphasize them compared to the breath sounds.
While pumping and breathing are generally thought of as unwanted artifacts of heavy compression, a gentle pumping timed to the beat, is sometimes effective in emphasizing a groove.
Types of Compressors
Types of Compressor Topologies:
Voltage Controlled Amplifier (VCA):
VCA compressors utilize a Voltage Controlled Amplifier, known for its speed and low distortion, giving it a clean character. Transparent compression is achieved through VCAs as they don't introduce coloration to the sound. However, if pushed, they can exhibit an aggressive quality. Commonly used VCAs include the SSL G Bus and the DBX 160.
Field Effect Transistor (FET):
FET compressors employ Field Effect Transistors to emulate the warm sound of tube/valve circuits. The renowned Urei 1176 is a prime example of an FET compressor. FETs offer a fast and bright response, making them popular in rock production. FET compressors add punch and color to the sound, making them particularly useful for percussive sounds and snappy transients.
Optical (Opto):
Opto compressors use a photocell as a detector and a light bulb to control the gain reduction. The time lag in the photocell's response leads to a slow attack and release, making this type of compressor ideal for handling vocals, gentle automatic gain changes, and mastering. The characteristics of gain reduction vary based on the type of light sensor and illumination sources used. Prominent Opto compressors include the LA-2A.
Vari-Mu:
Vari-Mu compressors utilize a valve (tube) for variable gain reduction. They exhibit a slow reaction, which makes them well-suited for "gluing" audio elements together. As gain reduction increases, the ratio also increases, giving this type of compressor a distinct sound. Vari-Mu compressors are good when used on the master/group bus to unify sounds into a cohesive whole, adding warmth and thickness to the audio. The Manley Vari-Mu is an example of a Vari-Mu compressor.
Each of these types of compressors have their plugin emulations to approximate the sound and response.
How To Listen To Compression
There are several ways to listen to compression to determine whether or not you're getting the desired effect. You can use this as a checklist when you're compressing.

Tukan Stereo Bus Compressor
- Listen to the energy and dynamics, with the compressor on, and bypassed. Does the compressor add energy, or take it away? If it takes away energy, think about lowering the amount of compression, either by raising the threshold, or lowering the ratio.
- Listen to the punch and body of the instrument. Has the compressor tightened up the sound, or made it wimpy? If it's wimpy, back off some and see if it improves.
- Starting with a fast attack, lower the threshold or increase the ratio until you can hear the sparkle in the top end disappear in the attack of the initial transients in the sound (especially with percussive instruments). Back the attack off until the attack comes through how you like it. Then back the ratio off and raise the threshold back to where they were. Compare the compressor on and bypassed and listen to the brightness of the transients.
- Once again, dig in with the ratio/threshold until you've got way too much compression. Play with the release time until it sounds the most natural. Especially with rhythm instruments, listen to the groove and make sure the release time adds to the groove, or at least doesn't detract from it. The release time should also let go before the next hit on a drum, or note on a musical instrument. Back the compression down to a reasonable level. You can also use the metering on some compressors to time the release. In other words, look at the meter to see when the release lets go.
- Now take a quick listen to all the factors again; dynamics/energy, punch/body, brightness of the initial transients, and groove.
Remember to match volumes with the output gain, as things tend to sound better a little louder. Matching the volume is the best way to avoid fooling yourself.
Compression FAQ
When Should I Compress? When Should I Not Compress?
Compression is a stylistic choice, home-slice. You don't have to compress. However, it's rare that a vocal track has no compression on it, or a mix bus. And remember, we have to somehow get the dynamic range of instruments squeezed into the dynamic range of recording.
Compression works best in small amounts, in stages. Otherwise, you might have to slam everything too hard with a limiter, in the mixing or mastering phases.
So, compress when you feel an instrument is inconsistent, volume-wise. Compress if you think the mix doesn't sound cohesive. Use parallel compression to bring excitement and control to an instrument or bus.
Compress individual instruments, buses, and the mix bus. Or no -- it's up to you.
Compression vs Limiting
A limiter is a compressor with an extreme ratio, designed to stop any signals from going above the threshold.
Clipper -- What Is A Clipper?
A clipper is similar to a limiter in that it attenuates signals so they don't go over the threshold. However, a clipper cuts of the signals abruptly, making the soundwaves look like the top of barber shears (get it? a clipper).
This abrupt cut off of the signal creates complex harmonic distortion that isn't there in the original signal. This distortion can be really ugly, or can help an instrument or bus really cut through the mix better and sound fuller. Limiters are generally more transparent than clippers.
Recording With Compression -- Should I Do It?
Maybe.
- Do you have a cool hardware compressor and you want to use it multiple times in your recording? Then use it when you record, on the way to 'tape', as we used to say.
- Do you have a hardware compressor and the performer is inconsistent with levels? Go ahead and use a compressor to keep the levels from overloading your input.
- Does your audio interface have a nice compressor built in and you like the way it sounds? Go ahead, if you're sure you won't want something different later.
- Do you like to have fewer decisions in the mixdown phase, and you know your compressor well, and like it? Go ahead, as long as you're sure.
Other than that, there aren't many good reasons to use a compressor on the way to recording the track (as opposed to after the track is recorded). Back in the day, your studio might have two or three compressors and you might want to use them on numerous tracks. If you wanted to use the same compressor on vocals and snare, you'd have to use it on the way to tape for at least one of those tracks.
Nowadays, we can have multiple plugin emulations running on multiple tracks, no problem. So it makes sense to save the decisions for later.
Compression Before EQ, Or EQ Before Compression?
Yes! Different audio engineers do it differently. Here's a common process that makes sense to me.
- EQ for tonal balance before you compress. This usually involves subtractive EQ (turning down frequencies) rather than additive EQ. In other words, if your vocal is too bass-heavy, reduce the bass before you compress. That way, the extra bass doesn't trigger the compressor unnecessarily.
- Then compress.
- Then EQ to taste. In many cases this is additive EQ. You might put a high shelf up a few dB to get more presence in the voice, for instance. Also, compression can sometimes dampen certain frequencies that you like, so you can use EQ to bring them back.
How Do I Use Compression In Mastering?
Compression in mastering is a big subject, and it's not possible to cover every possible technique or option. But here are some general guidelines. Mastering engineers typically use some compression on the master, to even out the dynamics and 'glue' the mix together (make it sound more like one cohesive recording, rather than a bunch of instruments thrown together).
This compressor will often have an attack time in the 100ms range and a bit slower release time, but it depends on the content of the music. Mastering compression typically has a small ratio, maybe 1.5:1 - 2.5:1, and seeks to take off just a few dB in the loudest parts of the song.
After that, there's often a brickwall limiter. It's there to keep your master from distorting. Brickwall refers to the fact that it's supposed to completely stop levels above the threshold, as if they run into a brick wall.
The brickwall limiter is usually the last thing in the signal chain.
Why Do I Have To Hit My Limiter So Hard When I Master?
Compression is best in little amount, in stages. Compress individual instruments some, buses and little and your mix bus a bit. Then hit the mix with a limiter. If you try to do it all in the final stage, it will likely be too much.
What Is Bus Compression?
A bus is the combination of channels or tracks. You might have several microphones on drums, each recording to a separate track. Ten you might group the tracks to one stereo fader. That's your drum bus. If you need to turn up an individual drum, you turn up the track for that drum. If you want to turn all the drums up or down, you can use the bus fader (sometimes called a bus master).
Bus compression is simply a compressor on that bus fader. It affects all the channels that are summed in the bus.
According to Sage Audio, "when using bus compression, very subtle settings should be implemented to avoid noticeable compression and artifacts."
In bus compression, a little bit goes a long way. Compression is more easily heard on buses.
Bus channels are usually stereo, and although there are specific compressors called bus compressors, you can use any stereo compressor for a bus compressor. Features commonly found on compressors labeled bus compressors include high pass filters, a link/unlink switch (to control whether the two channels of the compressor react together or independently), a mix knob (for parallel compression) and an auto release (auto release may use a faster release time on the loudest transients and a slower release time on quieter signals).
Compression Conclusion
The skillful use of compression is one of the main differences between amateur sounding recordings and mixes, and professional sounding recordings and mixes. As an independent musician, this helps you compete. With the guidelines and information found here, you should be able to get your dynamic range under control and use compression more effectively to make your music sound better!
Resources
Rea (Reaper) Plugins: ReaEQ, ReaComp, ReaXcomp, ReaDelay, ReaFIR and others come with Reaper. If you don’t have Reaper, you can download the VST versions of ReaEQ, and these other useful plugins here. If you want to follow along with my tutorials, it will be good to have these. VST/VST3 versions available for separate download (Windows & Mac).
REAPER JS Plugins: Specific to REAPER, the REAPER Stash is where you can find themes, plugins, effects, meters and more, written in the JS language. The Reaper Blog has a great tutorial on how to install these REAPER-only plugins.
TDR Kotelnikov: TDR Kotelnikov is a high quality, free compressor, with a knee control and a mix control.
TT Dynamic Range Plugin: A useful plugin for measuring dynamic range.
Tukan Plugins: Here's a video on how to install the very useful Tukan plugins from John Matthews. (Reaper only, though). Myk Robinson takes you through the install process.
Enjoy
Keith
