Let's talk about how to get good drum sounds to make your recordings sound great.
Drum Basics
Shells
A drum shell is the main, cylindrical body of a drum, which gives the drum its shape and allows it to create sound when struck. It's usually made of materials like wood, metal, or composites and is covered with a drumhead. Some drums may have heads on both sides of the cylinder, some on only one side.
The typical drum set has several shells, including a kick drum (also called bass drum), a snare drum (which has springs that run along the bottom head, to give it a 'snap' sound), rack toms (which sit atop the kick drum, mounted on a rack), and a floor tom (a bigger tom that sits on legs, on the floor).
Some drummers make do with one rack tom, a floor tom, kick and snare. Others have many extra toms and other percussion instruments.
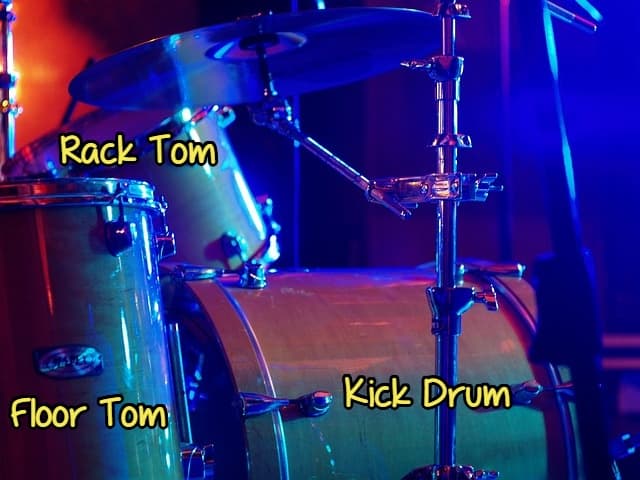
Kick drum, floor tom and rack tom
The combination of the drum shell and drumhead creates the drum's unique sound, and the size, shape, and materials used in the drum shell all contribute to its tone. Different types of drums have different sizes and shapes of shells to produce their distinct sounds.
Each shell will likely have at least one mic close to it, and perhaps two. Most often, the snare drum has two microphones -- one mic for the top head, and another for the bottom head to pick up the snap sound that gives the snare drum its characteristic sound.
Kick Drum
Kick drums sit on the floor. They are the biggest drum in the set, and provide the low-end thump which drives the music forward. Along with the bass guitar and possibly synthesizers, a bass drum provides the majority of the low end in a mix.
Snare Drum
A snare drum is a drum that sits next to the kick, on a stand. The snare has springs which are tightened along the bottom head, to make a cracking sound. Snare drums are often hit on the 2 and 4 of a standard 4 bar beat and provide much of the rhythmic drive for a songs.
Snares often have two mics -- one for the top head, and one for the bottom.
The bottom mic picks up more of the springs and thus is responsible for more of the high end. The top mic often gets more of the meat of the snare sound.
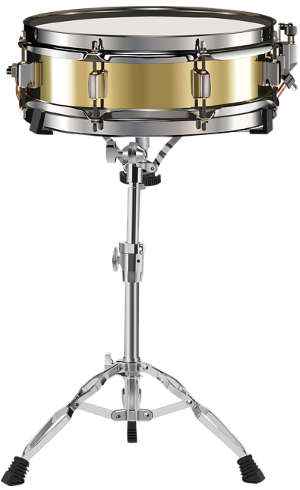
Snare Drum
Toms
A drummer might have any number of toms. They generally go from one side of the kit to the other, arranged from small to large. Toms are often used in drum fills, but are sometimes used in beats, as well.
Rack Toms
Rack toms are mounted on a rack, on top of the kick drum. They are on the the smaller size. If there are two rack toms, one is smaller and has a higher tone than the other.
Floor Tom
A floor tom sits on the floor and is the biggest tom, with the lowest tone.
Cymbals
Many drum sets have a variety of cymbals which include hi-hats, ride cymbals, and crash cymbals.
Hi-Hat
A hi-hat is two cymbals that are mounted on a stand. The cymbals are positioned on top of each other, facing opposite directions. The hi-hat can be opened or closed with a foot pedal. By adjusting the amount of pressure on the pedal, the drummer can create a variety of sounds. When it's tightly closed and hit with a drum stick, it makes a short, percussive, tight sound. When it's more open, it's splashier.
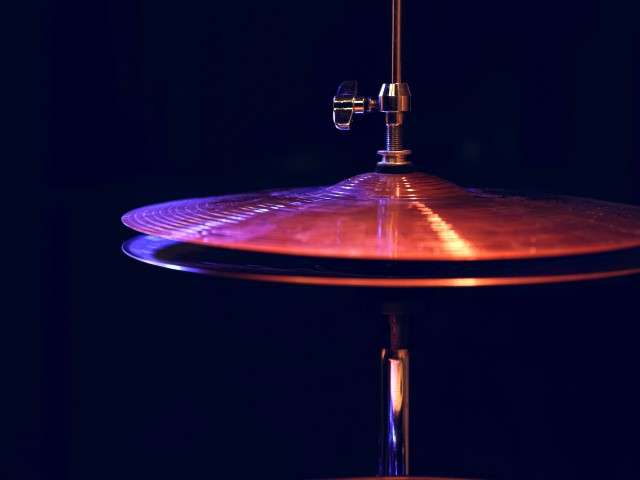
Hi-Hat
It can also be played with just the foot pedal, opening and closing the cymbals.
The hi-hat often provides to high end part of the groove, and is usually positioned just to one side of the snare.
Ride Cymbal
The ride cymbal is kind of the counterpart to the hi-hat. Often the rhythm moves to the ride cymbal from the hi-hat when the song arrangement changes. For instance, you might have a hi-hat in the verses, and a ride in the choruses.
The ride is generally for establishing rhythms, and not for emphasis like crash cymbals.
The ride is generally more open sounding than the hi-hat, and is usually positioned somewhat on the opposite side of the kit.
Crash Cymbals
Crash cymbals are for emphasis.
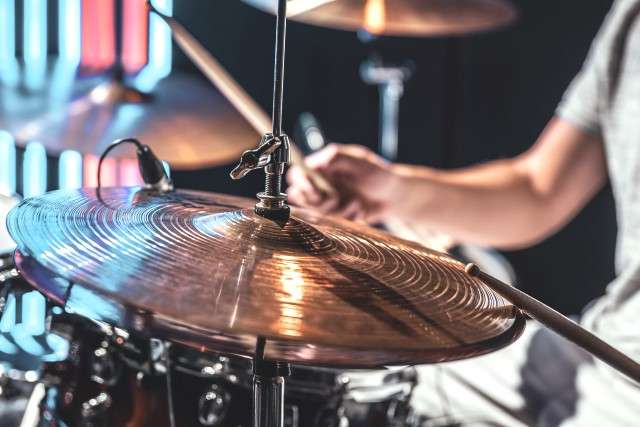
A variety of cymbals around a drum kit
Recording A Drum Set
Close Mics
Drum sets usually have many microphones set up to record them. Each of the shells typically has one mic, but sometimes two. Most often, the snare drum has a mic for the top and bottom head.
The hi-hat often has a mic assigned to it.
Overhead Mics
In addition to the close mics, we have overhead microphones. They are designed to pick up the whole kit, as well as the cymbals. The overheads are often positioned as a stereo pair above the rum kit. They can give the drum sound a stereo image and some sense of space.
Room Mics
A room microphone or two is sometimes used somewhere a good distance from the kit, in order to pick up the ambience of the room. This helps give the sense that the drums are being played in a physical space.
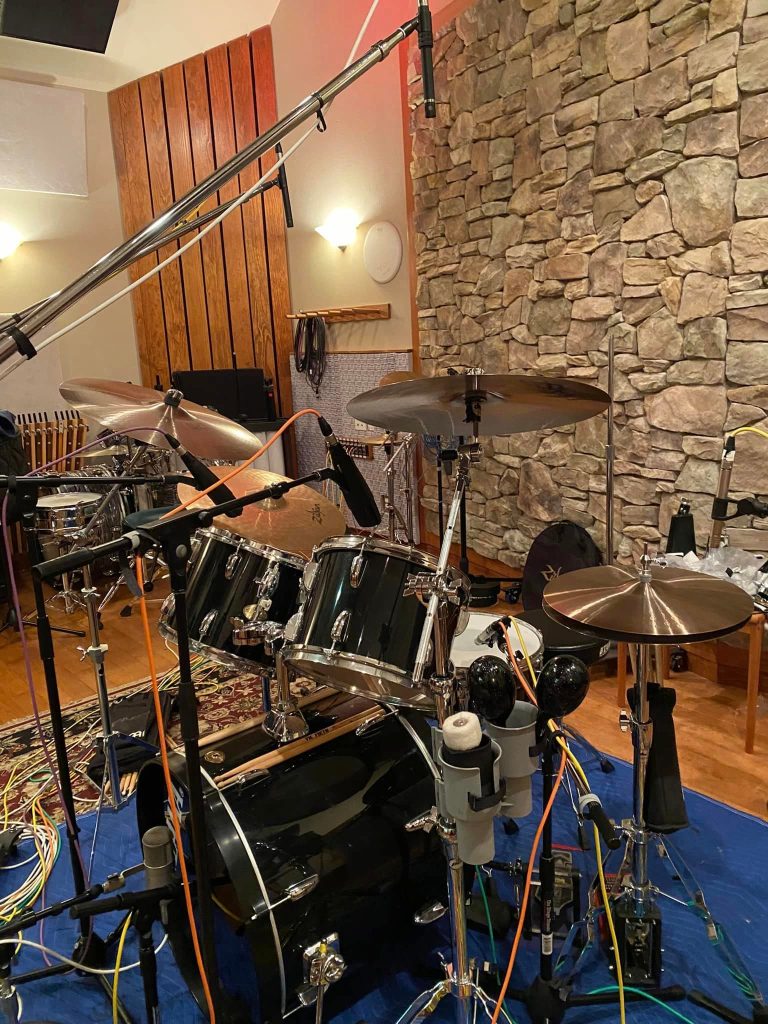
A full drum set, in the studio
On the above kit, notice the spaced, matching pair of mics above the kit. There are two microphones on the kick drum -- one inside the shell, and another on the outer head. There's a mic directly over the hi-hat, as well.
Microphone Types For Drum Kits
As a general guideline, you'll want dynamic, cardioid mics on any shells, and condenser mics for hi-hat, overheads and room mics. Dynamic mics can take the high sound pressure levels put out by shells. Condenser mics may do a better job of picking up the subtleties of cymbals.
How Drums Are Different Than Other Instruments
When you hit a drum, it's not the same as plucking a guitar string, or playing a note on a piano.
While a kick drum or a tom tom may have a note that rings, there's a lot of frequency information that's not harmonically related. You can tune a drum kit, but not to the extent you tune a guitar.
For this reason, drummers don't usually tune their kits to the key of the song. Drums are more percussive than tonal.
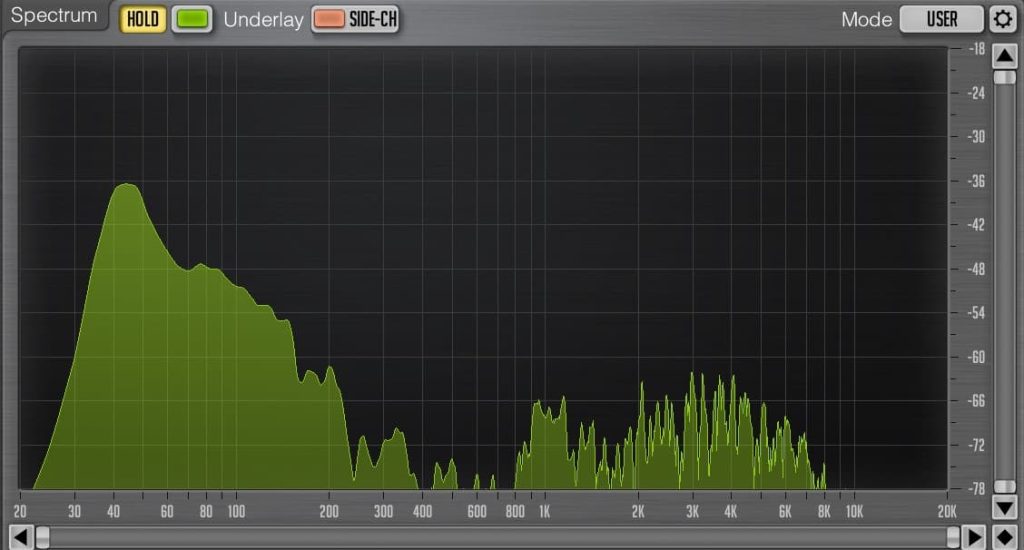
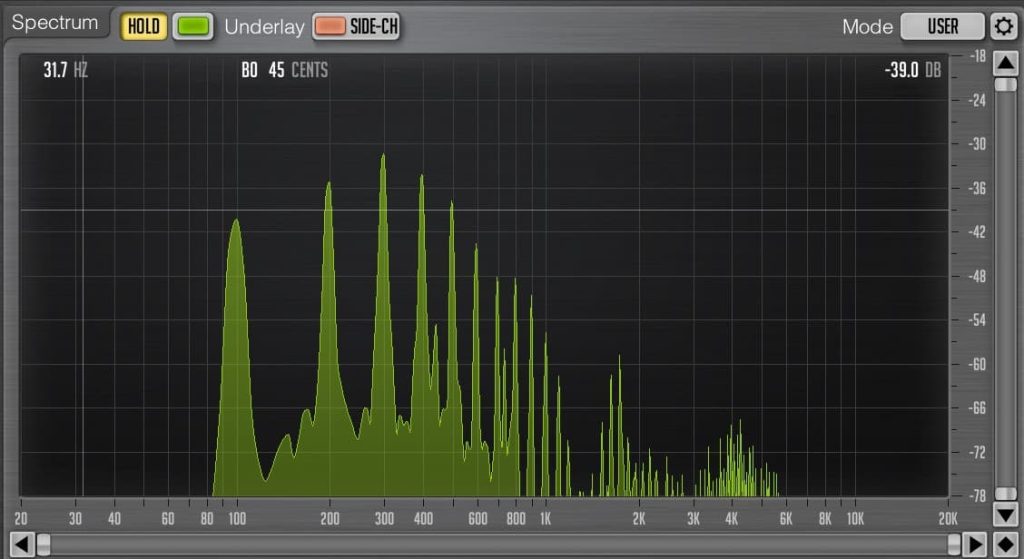
Notice the two frequency response charts above. The top chart is a kick drum and the bottom chart is a guitar, playing a single note.
Notice the guitar has a lot of mathematically related peaks. There's a peak near 100Hz, and also multiples such as 200Hz, 300Hz, and so on. That's what a musical note can look like on a frequency chart. It's largely harmonically related content.
The kick drum has a completely different frequency distribution. While there seems to be a fundamental frequency (a low note), you don't see a lot of harmonically related peaks. The oomph is there at about 50hZ, but 100Hz, and 150Hz and so on are not emphasized.
That's because a kick drum is more percussive and a guitar is more tonal.
Drum Frequencies
So, what frequencies are we looking for when we EQ drums? I divide it up into 4 areas. Get these 4 areas right, and you can easily EQ a drum to sound the way you want it to sound
4 Frequency Ranges For Bass Drums & Toms
- Fundamental Beef
- Woof & Mud
- Stick Hit
- Air
As a general guideline, the kick drum will have the lowest frequencies in the fundamental and woof areas. The floor tom will have something similar, but a bit higher up frequency wise. The biggest rack tom, even higher. And so on.
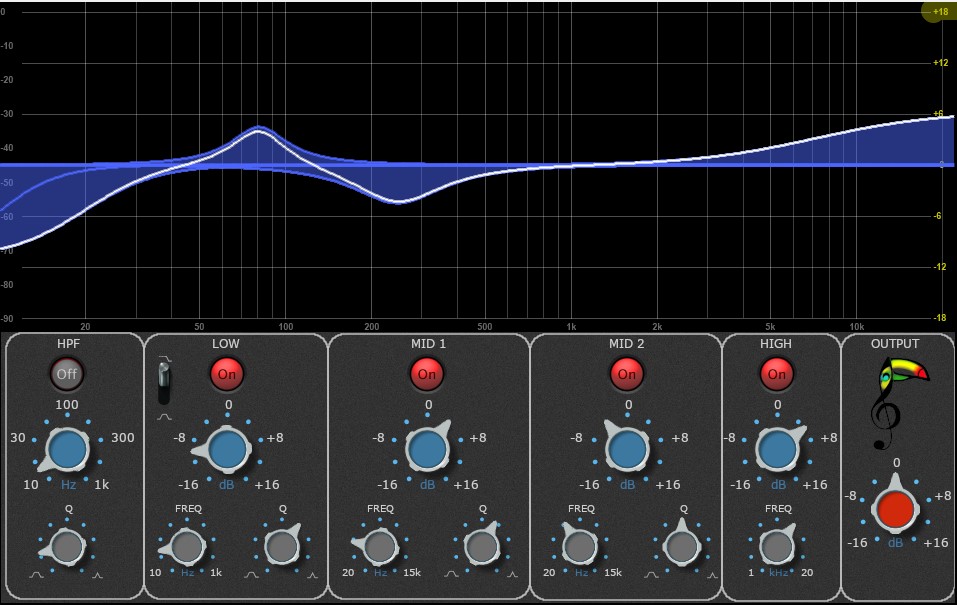
Kick Drum EQ: bass roll-off for ultra-low frequencies, low frequencies added for thump, low-mid cut and high shelf boost.
And so on -- with the smallest drum having the highest fundamental.
The stick hits and the air sounds may stay more consistent frequency wise. The one exception may be the bass drum. You hit the bass drum with a beater, which is made from a different material than the drumstick which hits the toms.
For the toms, the same drumstick material will hit the skins, which are different sizes, but probably the same material. Therefore, although the fundamental frequency of the drum is different, the impact from the stick hitting the skin may be similar.
So, what are we looking to control with each of these 4 frequency ranges?
Fundamental Beef: this is where to power and thud come from. Want a powerful driver for the low end of your mix? Emphasize this area.
Woof & Mud: this low-mid area is a bit higher than the fundamental, and will often be something you turn down a bit, according to genre and taste. Take out too much and your kick will start to sound hollow and unnatural. Leave too much in and your kick will sound like wet cardboard.
Stick Hit: if you want to bring out a stick hitting the skin of the tom, emphasize this range. For a more mellow sound, reduce it.
Air: is an area that gives you crispness and snap. Bring this area up too much and unless your drum shells are heavily gated, you might bring your cymbals up, to.
Snare Drum
The snare drum works much the same as the other shells, with one exception. The snare drum has springs stretched across the bottom head. The springs slap against the bottom head every time the drum is hit, giving the snare its characteristic sound.
So, if you want to bring out the snap of the snare, you'll need to find those frequencies in the high end.
The snare drum often has a microphone on the top head, and another mic underneath, pointed at the bottom head. You'll likely use the top head for the body, and the bottom mic for the high end snap.
Make sure you flip the phase of one of these mics to see if the sound improves.
Hi-Hat
The useful sound of a hi-hit is mostly high end. You'll want to get rid of the low frequencies in this mic. You're looking for frequencies which contain the stick impacts and the high-end sizzle.
The stick impacts drive the rhythmic elements. The higher end gives you the sizzle. Too much sizzle and you get harshness and splash.
Overheads
When recording drums, there's usually a pair of overhead mics capturing a stereo image of the drum set, from above. In addition to picking up everything on the kit, they'll give a bit of a sense of the space of the room.
Typically, I'll use the overheads to get the main feel of the drum sounds in the mix, and add the close mics in to get more immediacy and impact. It's usually better to get the low end from the close microphones.
Speaking of low end, I sometimes use a high pass filter on drum overhead mics. The reason is that you typically want to keep low end elements centered in your mix. The overhead mics are often panned away from each other to get some stereo imaging happening. You might not want the low end from the kit panned out to the sides.
This isn't a rule or anything. I don't always do it. And where you would set the roll-off frequency is a matter of taste.
Room Mic(s)
Sometimes, drums will be recorded with one or two room mics, to give a sense of the drum kit being physically in a space. I will almost always high pass room mics to prevent low and mid frequency buildup.
Gating Drums
A gate cuts off signals when they fall below a certain level.
Many times, mics on the shells of a live drum recording are gated. This is because these mics may also be picking up unwanted sounds of the other drums and cymbals. So, we want to hear the sound of a tom (for instance) when it's hit, but we don't want the cymbals to get turned up if we turn the tom up.
And if we boost the high frequencies on the tom, we don't want the cymbals to get louder. So, the solution may be to cut the tom mic's signal off when the tom is not playing. You can do that with a gate.
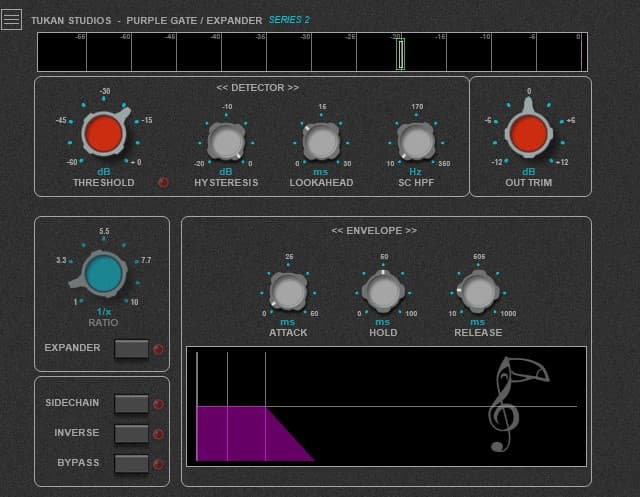
Tukan Studios Purple Gate/Expander Front Panel
You set the threshold on the gate to open the gate when the tom is playing, but so that the volume is turned off when the tom is not being struck. This sounds simple, but it's not always possible to get a clean gate all the way through the song. With today's digital audio though, you can go back through the recording and lower the volume manually if you need to.
Compression On Drums
Compression evens out volume. On drums if set correctly, compression can make drums sound punchier and more exciting, while still allowing the impact to come through.
Compressing Individual Drums
Doing a few dB of gain reduction can really tighten up a drum sound. Set the attack as fast as it will go, turn the threshold down until you squeeze the life out of the drum. Then back the attack time off until you hear the 'snap' of the drum come back. Now back the threshold off until the body of the drum comes back. Compare with the compressor on and off. Listen to the two sounds at the same volume, and notice if there's an improvement.
The release time should 'let go' of the compression before the next drum hit. 200ms is a good starting point.
The ratio should be something reasonable, maybe 4:1.
No drum is off the table in terms of compression. Drums are very dynamic, and controlling the dynamic range can really help bring your mix under control. However, I generally stay away from compressing the overhead mics, or it's light compression.
Compressing the room mic hard and then bringing it up in the mix can really add some excitement to a drum sound. Give it a go!
Parallel Compression
Parallel (or 'New York') compression is often used on drums. Parallel compression means to mix a compressed signal with the unaffected signal. So, you've got some 'dry' signal, and some compressed.
This allows you to really clamp down on the drum sound for some of that extra 'splat', and the judiciously mix that in with the non-compressed, more natural sounding drums.
In the old days, parallel compression was achieved by patching the drum bus into a compressor and returning the compressor back to a couple of faders. These days, many compressors have mix controls, so you can blend compressed and uncompressed signals.
You're looking for somewhere around 6 - 12 dB of gain reduction, so set the threshold for that amount of compression. Bring the dry signal up, and then gradually bring the compressed signal in. You'll hear the drum sound get more exciting as you do. At a certain point, the drums will begin to sound overly squashed. Back the compressed signal down to where you like it.
Now bring both levels up or down together, to match the volume of the signal coming into the compressor (gain staging).
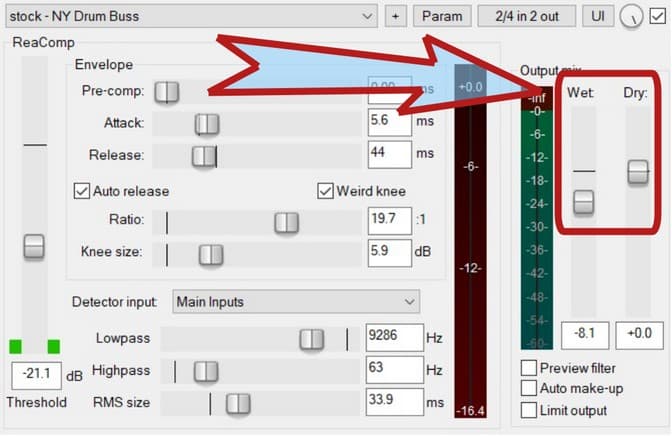
ReaComp, on the NY Drum Buss preset, with compressed and uncompressed signals mixed.
Saturation On Drums
Sometimes, a bit of saturation or distortion really helps a drum cut through a mix. I often use distortion on a kick drum. Too much and you lose some definition. Just a touch can help it cut through, especially on smaller speakers.
Replacing Drum Sounds & Layering Samples
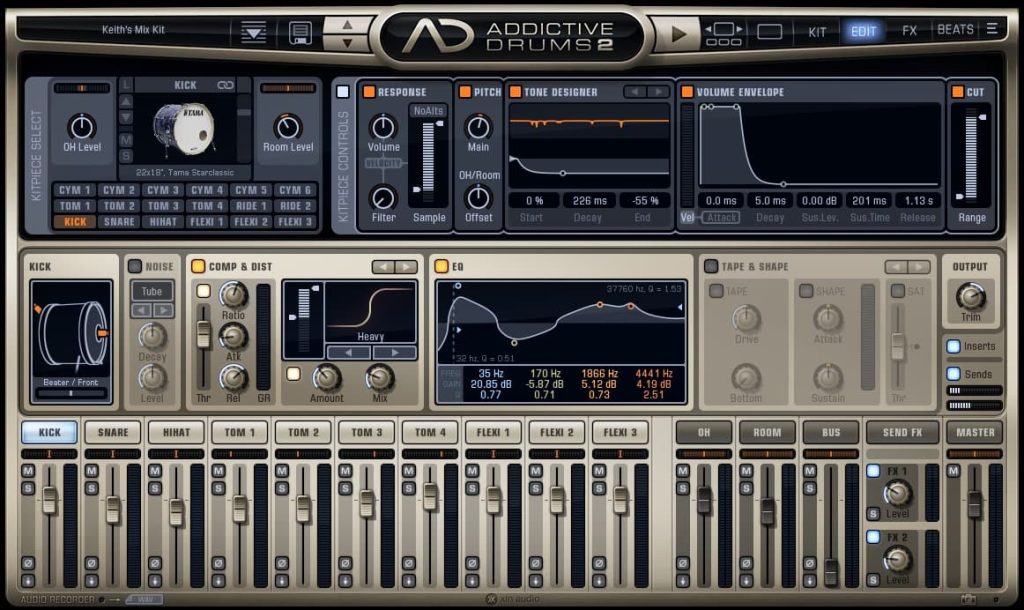
If you don't like the drums sounds you've got, you can replace them. You can use the sounds you've got to trigger samples of better sounding drums. Sometimes, you might decide to blend the recorded and sampled sounds.
All the previous ideas apply to the sampled sounds. You can EQ them, add saturation, send them to reverb etc.
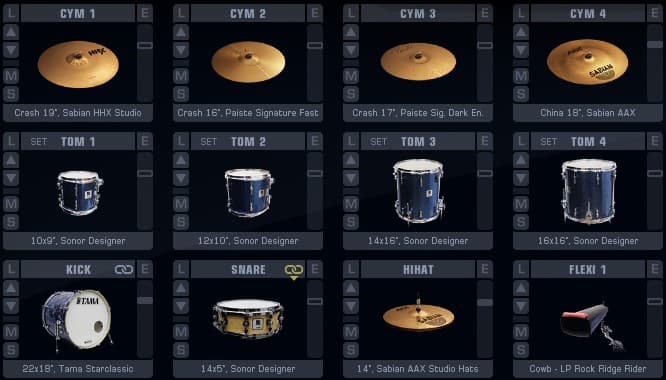
Some Of The Drum Choices From Addictive Drums 2, Software Drum Production Studio
You can really go overboard with this stuff. I'd suggest adding samples and layering to solve a specific problem you have, and not just because you can.
Adding Noise To Your Snare Drum
One way to get a nice high end to your snare is to use the snare sound to trigger some white noise. When the snare hits, the white noise is triggered, and adds high end to the sound. Consider sending the noise to the snare reverb.
Adding A Tone To Your Kick Drum
You can use a sine wave generator to generate a low tone. Perhaps 60Hz, or so. Then use the kick drum to trigger it. So, when the kick hits, you get a short burst of low end added to your kick drum.
Drum Machines, Samples & MIDI Drums vs Live Drums
In addition to replacing drums with samples, you can create your whole drum track with MIDI and a drum plug-in. The advantages of virtual drums are that you have some of the best drum sounds recorded in the top-level studios, incredible control over every drum hit and sound, and you can get existing MIDI patterns played by excellent drummers -- and these patterns can include the drummer's timing and feel.
The main disadvantage is that you probably aren't a drummer. And a drummer can tailor the drum part to your song. They might have a dozen great ideas for a fill to fit your particular arrangement.
How Virtual Drums Work
Sampling
Drum machine software makers take top-flight drummers into recording studios. They record audio files of drummers hitting their drums in different ways. Those files become the samples that are later triggered by the drum software.
Creating MIDI Drum Files
Creating MIDI With Live Drums
They also can use audio they record and turn it into MIDI information when a drummer plays a beat, a fill, or a whole song. MIDI records note and velocity information, as well as timing. When you play the MIDI information back through the drum software, it triggers the samples of the drums.
So, virtual drums are essentially samples, triggered by MIDI. MIDI drum files can contain the subtle timing fluctuations and the groove of drummers.
There are many companies that produce MIDI drum files you can buy.
Creating MIDI Drums Via Programming
You can also create MIDI drum parts by playing them on a MIDI keyboard, or even a computer keyboard. And, you can program them directly in your DAW on a note grid with a mouse.
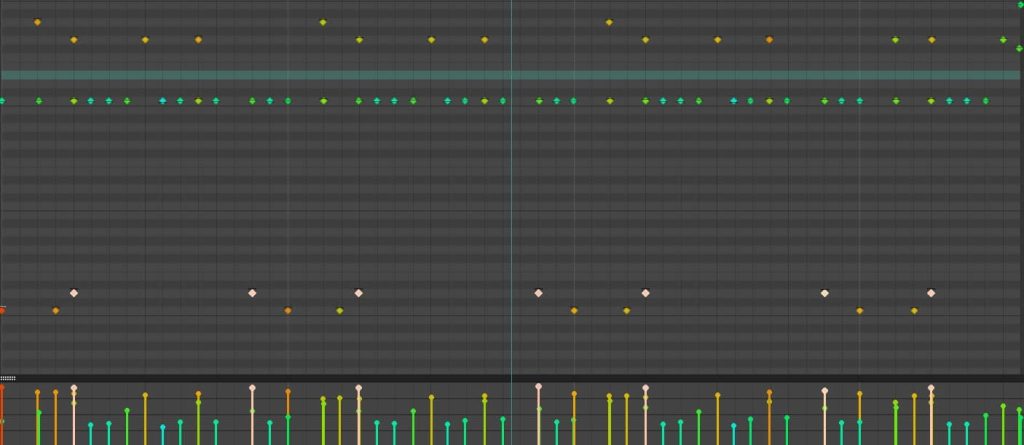
A MIDI Drum Patten Shown In Reaper's Piano Roll Window
Creating MIDI With An Electronic Drum Kit
There are also electronic drum kits that are designed to create MIDI tracks, rather than create sounds acoustically. On a MIDI drum kit, the "drums" aren't very loud. They are often rubber/silicone pads, arranged in the shape of a drum kit. The pads contain sensors that are triggered when hit.
The sensors in the drum pad also track how hard you hit the drum. This information gets sent from the drum and triggers a drum sample somewhere down the line. Many electronic drum kits have sound modules with drum sounds in them. Or you can record the MIDI output to your DAW, and use the MIDI track to trigger whatever drums sounds you have available.
The advantage to electronic kits is that you can record with them in situations in which you can't record loud drums. They also work well when you don't have a nice sounding room. As an independent artist, you might not have a big budget studio at your beck-and-call. And you get the feel of a human drummer (assuming your drummer is human).
How To Mix Drums
Overhead Mics & Room
I like to have a rough mix going, and then turn down all the drums. I'll bring up the overheads until the cymbals sound about the right level. The rest of the kit should be coming through, as well, including some stereo information. You're looking for sort of a skeleton of the sound. It's not complete, but most of the elements should be there.
Then I'll bring up the room microphones, if there are any, until I like the way they add space to the drum set. If the cymbals are too loud at this point, I back the overheads and room mics down equally
At this point, I bring in the hi-hat mic to enhance the hi-hat sound, adding to whatever the overheads are picking up. The hi-hat is often very important in terms of establishing a groove. However, it should reasonably balance with the ride cymbal which will probably be panned away from the hi-hat, somewhat.
In other words, holding down the high end of the groove is going to switch back and forth between the hi-hat and ride cymbals. They should be fairly balanced volume-wise, and take up a different part of the mix, spatially.
Shells
Once that balance is where I want it, I ask myself what's missing. Usually, it's just the body of the shells and sometimes the snap of the snare.
I'll start with the kick, with whatever EQ is on it already, if any, and bring it up to where I want it. Once it's in the ballpark, I'll ask myself if it needs EQ.
If it needs thud, I'll locate the fundamental and boost that up. If it sounds boxy, I'll locate the woof and pull some out. If I want to hear the beater hits more clearly, find those frequencies and boost them. And then add air, if needed.
If this was a live drum kit, you'll have the cymbals bleeding into the kick drum mic. You'll probably gate the kick to cut them out. But be careful any high -end boost isn't boosting the cymbals too much.
If it is, bring down the overheads and room mics a bit, or EQ then a touch differently, or back off the high end on the kick.
Repeat this process for the rest of the drum close mics -- except you're looking for the stick impact rather than the beater impact. In other words, find the beef, woof, stick hit and air and adjust to taste.
Panning
You can pick a perspective as far as panning goes -- either the audience perspective of the kit, or the drummers perspective. Just make sure your overheads and close mics match the panning on your toms. In other words, if the firt rack tom shows up a bit more on the right speaker in the overheads, pan the close mic to that same place.
As a guideline, it's common to pan the kick and snare center, the hi-hat a little to the opposite side of the ride cymbal, and the toms from one side to the other.
At this point, I have a decent drum mix going, and can decide to add ay compression, saturation, or reverb to polish it up.
Resources
Rea (Reaper) Plugins: Includes ReaGate, ReaEQ, ReaComp, ReaXcomp, ReaDelay, ReaFIR and others come with Reaper. If you don’t have Reaper, you can download the VST versions of ReaEQ, and these other useful plugins here. If you want to follow along with my tutorials, it will be good to have these. VST/VST3 versions available for separate download (Windows & Mac).
REAPER JS Plugins: Specific to REAPER, the REAPER Stash is where you can find themes, plugins, effects, meters and more, written in the JS language. The Reaper Blog has a great tutorial on how to install these REAPER-only plugins.
Tukan Studios; For Reaper, best added via ReaPack. How to install via ReaPack.
Enjoy
Keith
