Latency (the time between when a signal enters a system, and when it exits), is distracting when recording vocals.
To avoid latency altogether, you can monitor the mic rather than the output of your DAW, if your audio interface allows it. This is called direct, or input monitoring
But direct monitoring is a dry signal, and most people want to hear some reverb or delay when they’re recording. So, how do you hear at least some vocal with zero latency, but with reverb and delay so it sounds decent as you record?
Well, you can combine direct monitoring of the microphone, with FX added in the DAW. Here’s how.
How Do You Record Vocals With No Latency, While Hearing Reverb?
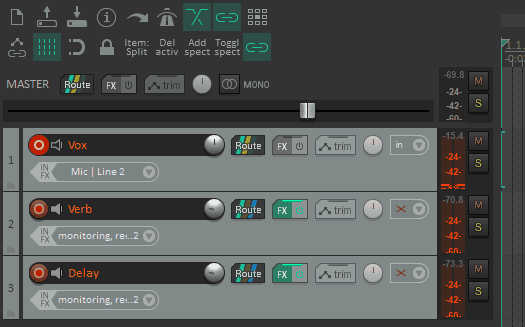
What I do is add 3 tracks. Track one is the vocal track. Tracks two and three are for FX. I turn off record monitoring for the vocal track. That means I won’t hear the vocal mic through the DAW when recording. I turn on record monitoring for tracks two and three (my FX tracks). That means I will hear FX when recording.
I monitor the vocal track via direct monitoring on my interface (that means I hear the vocal microphone before it goes into the DAW — therefor, no latency). It’s only the FX I monitor via the DAW.
Now there are a few steps in setting this up, but don’t worry. Do it once, and save it as a track template and you can recall it and start cutting vocals within a few seconds.
Here’s the step-by-step . . .
REAPER Track Setup For Recording Vocals
- Add 3 tracks and record arm them. Select the correct input for your microphone in all 3 (if your mic is plugged into channel one, choose Mic/Line input 1).
- Label them Vocal, verb, and delay (or whatever effects you want on your vocal).
- Turn record monitoring off on the vocal, and record monitoring on for the FX tracks (it’s the little speaker icon).
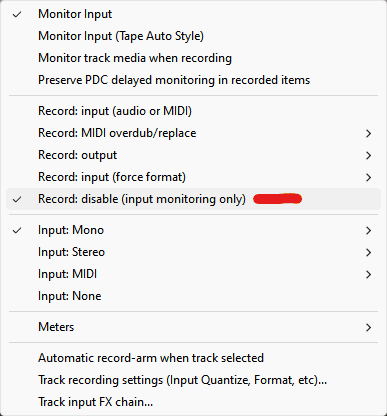
- For the FX tracks, select ‘Record disable (input monitoring only)’. To do this, right-click the ‘Record arm’ button).
- Add FX to both FX channels (Click on the FX button, add the FX and set them to 100% wet).
- Route the vocal channel to the FX channels by left-clicking on the vocal channel’s route button and dragging it to the route buttons on both FX channels.
- Set the FX levels by using the volume knob on their respective channels.
- Set up direct, or input monitoring on your interface (it varies by manufacturer) and get a reasonable vocal level in your headphones.
The ‘Record Disable’ Menu Option
Now you can record while hearing FX, with no latency from the direct monitored signal. The FX won’t be recorded, but you can hear them on playback.
You control the level of the FX by using the volume controls on the FX. You can change the level of your vocal in your headphones by using whatever input/DAW balance control your interface provides for direct monitoring.
Changing the input monitoring level just changes the level in your headphones, not the recording level.
EpicVerb Set To 100% Wet
Save A Vocal Recording Template
This might seem complex to set up, but you only have to do the routing once. Then you can save the layout of your vocal and effects tracks as a track template. Any time you record vocals in the future, just ‘insert from track template’, and you’re good to go.
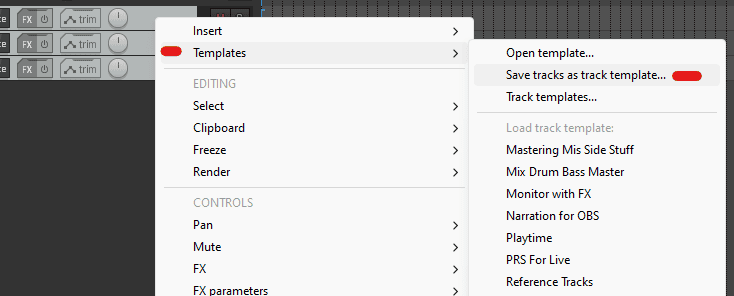
Save Tracks As A Template
To create a track template, select all the tracks you want in the template, right-click and select ‘Template’ then ‘Save tracks as a template’. Name your template and then you can recall it any time you wish.
You recall a track template by right-clicking on an empty space in the track control panel and choosing ‘Open template’.
Creating A Pseudo-Master
I often create a master for all the tracks that are not vocal tracks. That way, it’s easy for me to control the relative volumes of the voice and music tracks. If the voice is too quiet, I just turn my music tracks down with the pseudo-master, and turn my headphone volume up.
To create a pseudo-master, simply add a track, position it above your music tracks, and drag all the music tracks into it.
Put any vocal tracks you’re recording above the pseudo-master.


