Reaper Setup: Key Takeaways
Reaper: What Gear Do You Need?
Computer
Virtual Instruments
Speakers/Headphones
Instruments
Microphones
Audio Interface
You don't necessarily need all of these, but this is a typical setup for an independent musician's home recording setup. You might also have additional gear, such as outboard mic preamps, outboard processors, or MIDI controllers.
Reaper & Audio Interfaces
So, you have Reaper, a computer, speakers/headphones, an audio interface, and all the microphones, stands, and cables you need. But how do you hook it up? Let's get into it!
Audio interfaces typically hook up to computers vis USB or thunderbolt. The signals go both from the interface to the computer and from the computer back to the interface. There's some software that sits in between the interface and the computer. It's called a driver.
Download Your Driver And Set Up Your Audio Interface With Reaper
Plug your interface into your computer and head to the audio interface's website and download and install the driver.
Once you install the driver software, head to Reaper preferences menu ('Ctrl/'cmd' + 'p', or Options > Preferences). Mac computers don't need all of these settings, so if you don't see some of what I have here, it's ok. Don't worry.
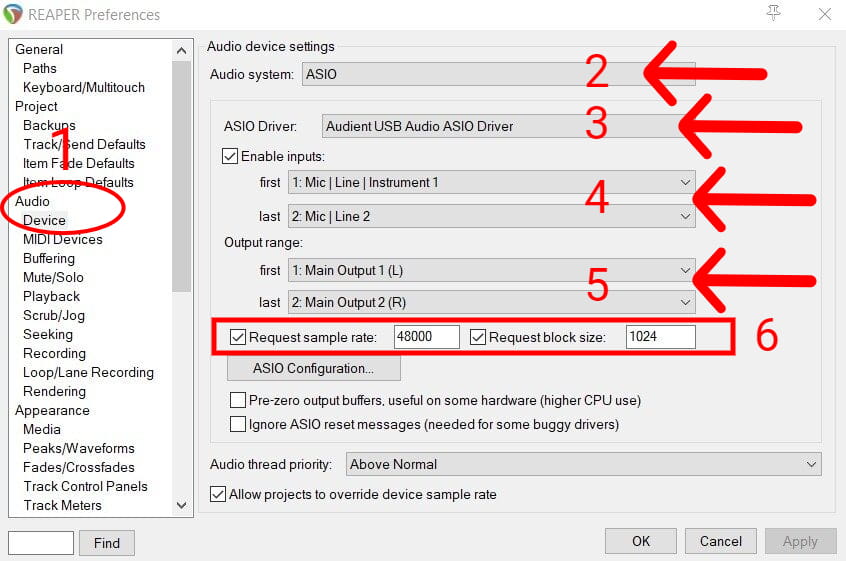
Reaper's Device Settings
Here are the steps to set Reaper up with your audio interface . . .
Step 1 - Select 'Device' under 'Audio
It's on the left-hand side.
Step 2 - Windows Only -- Select ASIO from the drop-down
Windows uses different kinds of drivers for different purposes. Select ASIO, as that's the kind of driver you'll use.
Step 3 - Select your manufacturer's driver
If you don't see the your audio interface's manufacturer listed here, something went wrong during installation.
Step 4 - Your inputs
This list will look different depending on how many inputs your audio interface has. Mine has only two, so the first input is #1, and the last is #2 🙂
If your interface has 8 inputs, select #1 as the first input and #8 as the last.
Step 5 - Your output range
L & R outputs should go to the left and right outputs of your audio interface, through his dropdown. If you have more outputs, you can assign them here, but it's not necessary to do that to start recording.
Step 6 - Sample rate and block size
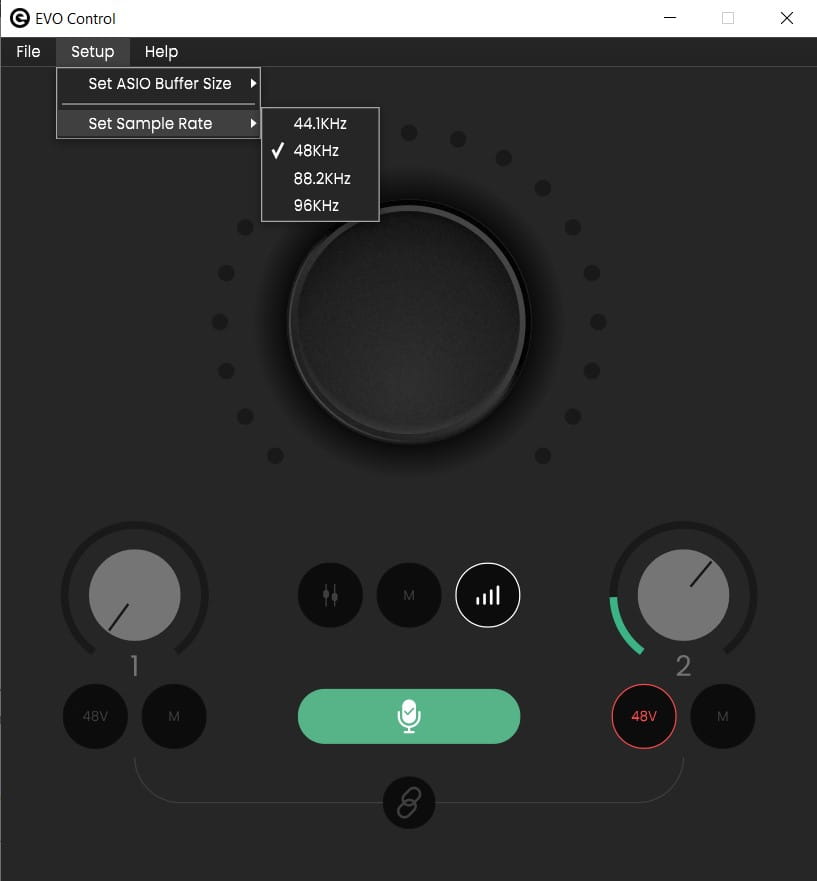
Some audio interfaces have software that controls their sample rate and block size. But you can also set it in Reaper. The 'Request sample rate' and 'Request block size' checkboxes mean you're controlling them from within Reaper and overriding the interface's controls.
It's fine either way.
If your audio interface doesn't like to give up control, leave the boxes unchecked and use your interface's software. In this case, entering the numbers in Reaper will have no effect. Otherwise, you can check the boxes and set your sample rate and block size in Reaper's preferences. Either way is fine.
I record at 48 kHz, 24 bit. You can do differently, if you like. If you're not sure, 48 kHz is a good call. For your block size, it works in powers of 2. You know, 16, 32, 64, 128 and so on. The smaller the number, the faster your computer processor works, and the lower the latency (the delay added by the computer for processing audio).
But lower block size also puts more load on your computer, which can result in clicks and pops in your audio.
So, block size is a compromise between speed and audio. Run it high enough to prevent crackling sounds and low enough o that you can play your speed metal licks in sync with the music.
At 64 samples, the block size setting adds 3 - 3.5 ms of latency for me. That's equivalent to the delay from standing about a meter/yard from a speaker.
If you're doing something that doesn't require playing or singing in sync with the music, you can set the block size higher.
If You Have Problems
Sample rate mismatches can cause problems with audio. It's best to run everything at the same rate. If your interface has a sample rate control, set it for the same sample rate as Reaper.
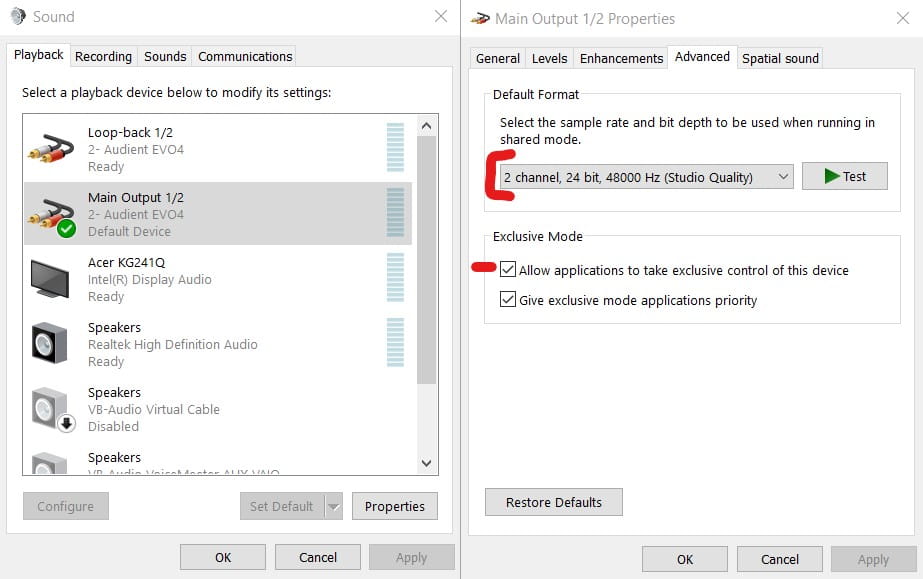
Set your system audio to be the same as Reaper, as well.
Can't Play YouTube Vids?
'Allow applications to take exclusive control of this device' can be an important setting. Checked, it means that your browser or media player can take control of your audio interface. If you can't play YT videos or hear audio in another application, try this setting.
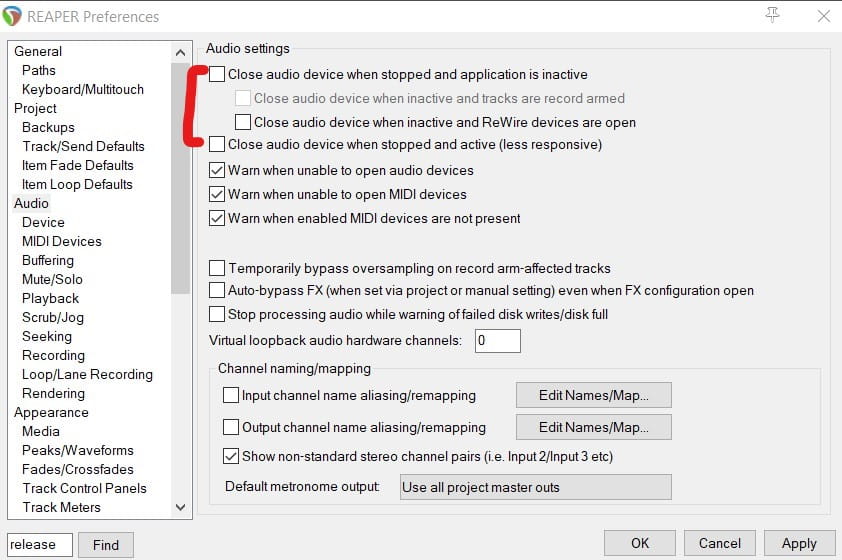
Another setting that might help is shown in the menu above -- 'Close audio device when stopped and application is inactive'. This will release the driver for other devices, when Reaper isn't in focus. I haven't needed it as the 'Allow applications to take exclusive control of this device' Windows setting works for me.
Now you're ready to record. Plug a mic or guitar (or a even a 'gasp' bass guitar) in and you're ready to record.
Signal Flow
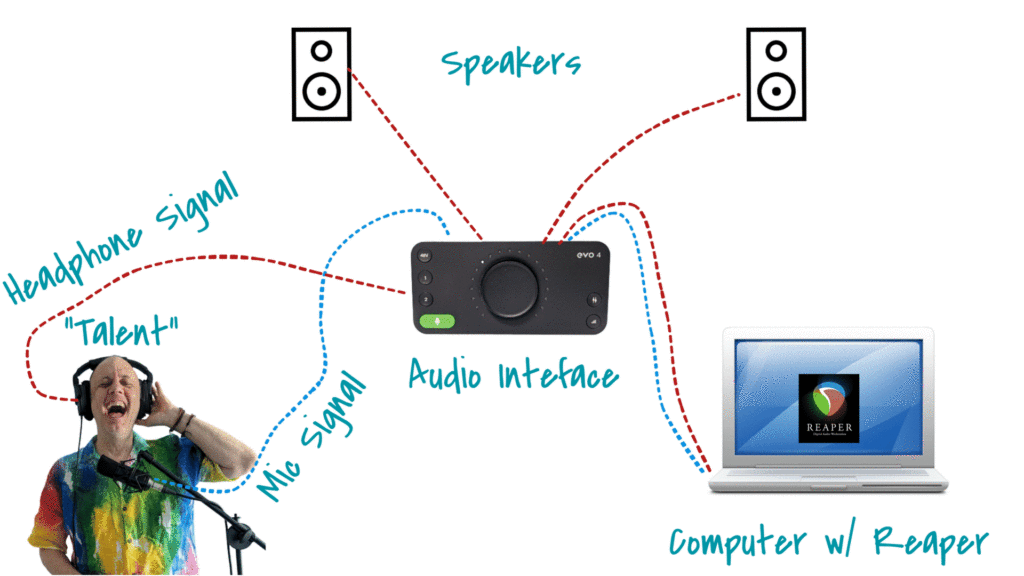
Your audio interface acts as a hub, though which your audio signals flow.
The audio signal starts out with a sound source into a microphone or pickup. Then the audio interface digitizes the signal so your computer can understand it. The signal goes off to your computer and is captured by Reaper, your recording software (DAW).
The signal heads back out to your interface, where it's converted back to an analog signal, and sent you your speakers and/or headphones for you to hear.
So here's what you have to plug in.
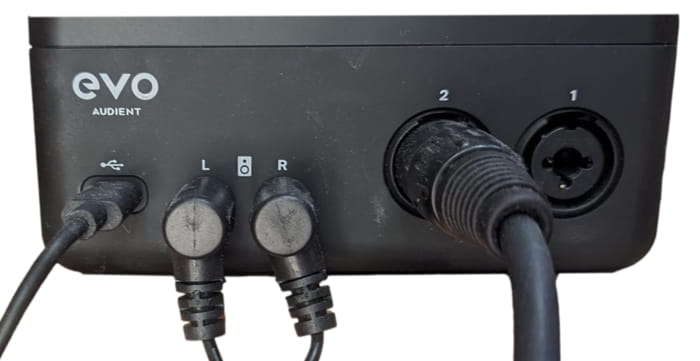
Evo4 Back Connections
How To Record In Reaper
Let's look at those in a little more detail . . .
Create A New Track
There are a bunch of ways to add a new track in Reaper. The easiest is to pick an empty spot on the track control panel (TCP) or the Mixer and double-click. Boom!
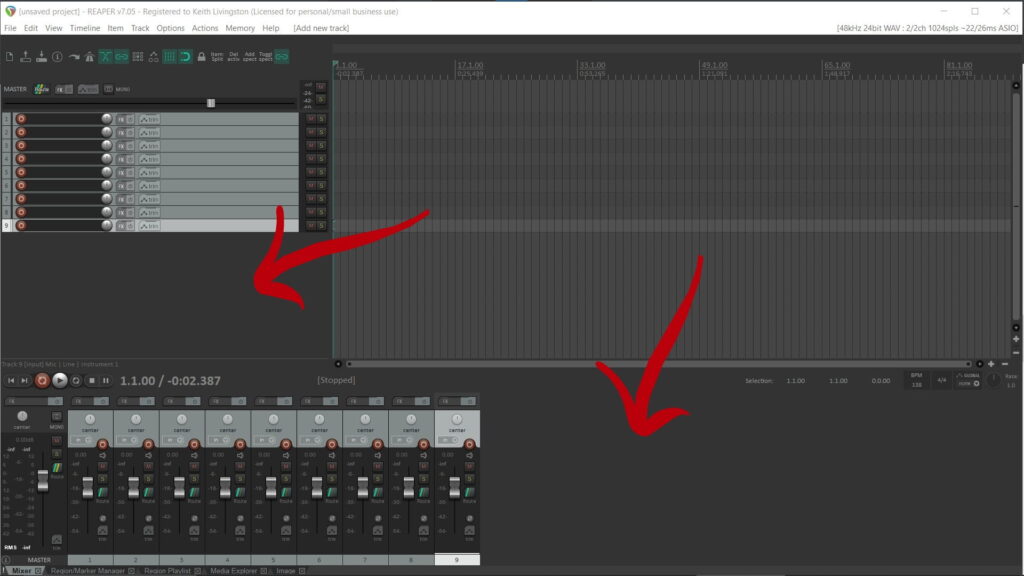
Creating A New Track By Clicking On An Empty Spot In Either The Mix Window, Or The Track Control Panel
'Ctrl'/'cmd' + 't' will also get you a new track. As well selecting the 'Track' menu, then 'Insert' then 'Track'. You can also use that menu to insert multiple tracks. But double-clicking is just as fast!
Record Arm The Track
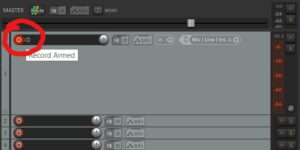
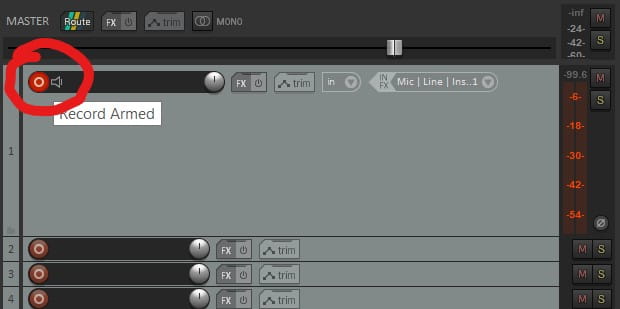
The little red button in the upper-left on your tracks, record arms the tracks. Once clicked, the button will turn bright red and the track will be ready to record.
Select The Correct Input
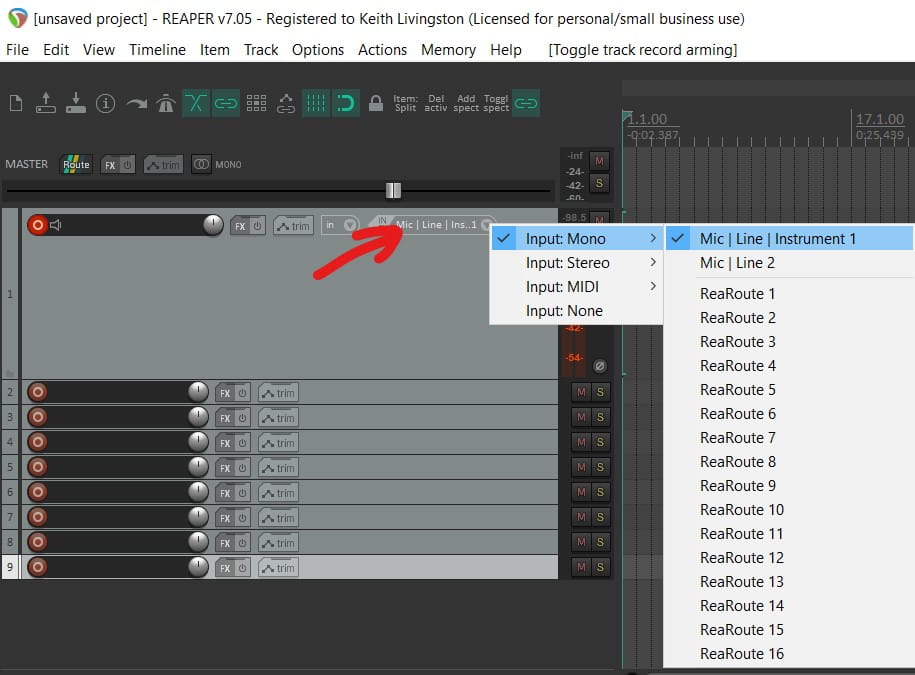
But before we record to that track, we need to tell it what to record. Your audio interface may have multiple inputs. How does Reaper know which input to record? Well, that input thingy!
It's called the 'Input Source' and it, erm, selects the input source. In other words, if your microphone is plugged into input number 1 on your audio interface, click the 'Input Source' and choose 'Mic | Line | Instrument 1'
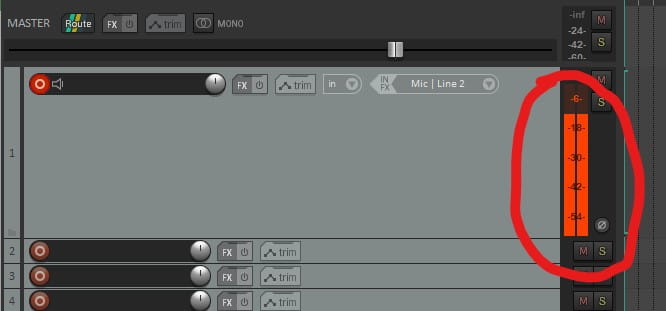
Once you've elected the correct input source, you should see your meter bouncing around a bit, if you've got something plugged into your audio interface. Let's set some levels.
Setting Levels
Each audio interface has a different way of setting levels. In general, you turn a knob up or down on your audio interface to get a level that's not too strong and not too weak. Sometimes it's a hardware knob, and sometimes it's a software knob. You're aiming for a level of about -18 dBFS average, and no greater than -6 dBFS at the loudest part.
Your audio interface may have metering (sometimes a light that goes from green [good] to red [bad]).
Reaper itself has metering. The meters here default to peak metering (dBFS), so you'll be able to see the meter readings right next to the track.
Recording
I bet you can guess which button you press to record. It's the red, record button on the transport bar, below. Go ahead. Press it. See what happens.
The transport section works much like an old-fashioned VHS that we used to use before the wheel was invented. 'Record', 'Stop', and 'Pause' do exactly what you might imagine.
If you don't see the transport bar, go to the view menu and check 'Transport'.
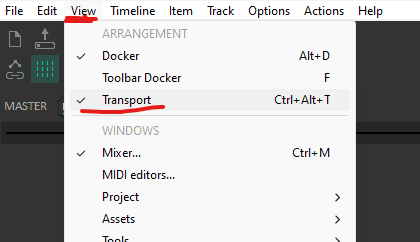
View Transport Menu
File Management & Other Preferences
Out-of-the-box, Reaper's defaults aren't the most efficient for most people's workflow. Here's what you should do about it.
You can do this easily in a few minutes. Here's more detail . . .
Reaper File Types
Reaper makes a few different files and file types.
Reaper doesn't generally create MIDI files (although it can), but stores all the MIDI information in the project file, itself.
By default, Reaper dumps all these files into one big mess. But it's all changeable in preferences. Just a couple of minutes setting the file preferences up, and you'll be well-organized and ready to rock.
It makes sense to store the necessary files related to a project in a directory. I have a bunch of songs, so it makes sense for each song to have a folder, and my project and audio files in that folder.
I have an internal SSD drive (K), which isn't the drive that has my OS. On that drive, I have a 'Song Projects' folder. Within that folder I have individual song folders. The song folders contain the project file, undo files, and a 'Media Files' folder, which has all the audio related to that project. Simple.
The rpp-bak, rpp-undo, and ReaPeaks files are not something you need to think about much. If you accidentally delete the Reapeaks files, Reaper will just create them again when you next open the project. The backup files are only needed in an emergency. And the undo files can sit in the project directory. If you lose them, it just means you won't be able to undo your latest actions in Reaper.
I mean, you can undo them, but you can't do it by 'Ctrl'/'cmd' + 'z'. You'll have to do it manually.
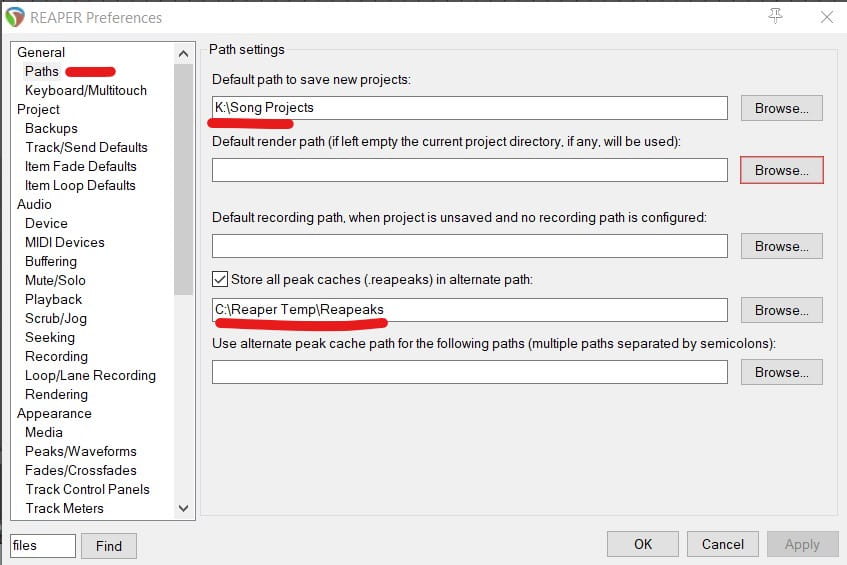
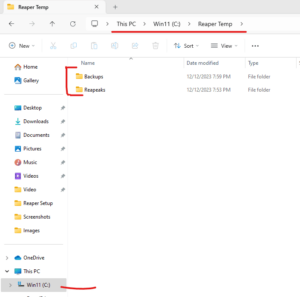
So, we can dump the rpp-bak and ReaPeak files somewhere else, where they don't clutter up the project file. That will also make it easier to delete them when we're done with the project. I've created a C:/Reaper Temp directory and put them all there. Every few months I empty it out.
Here's how to set that up in preferences.
- 1Open 'Preferences' and select 'Paths'. Choose the folder where you want to store song projects (Ironically, I call mine 'Song Projects'), and set the path under 'Default path to save new projects'.
- 2Select the 'Store all peak caches (.reapeacks) in alternate path' and choose where you want to store them.
Next, let's set up your backup and undo file paths.
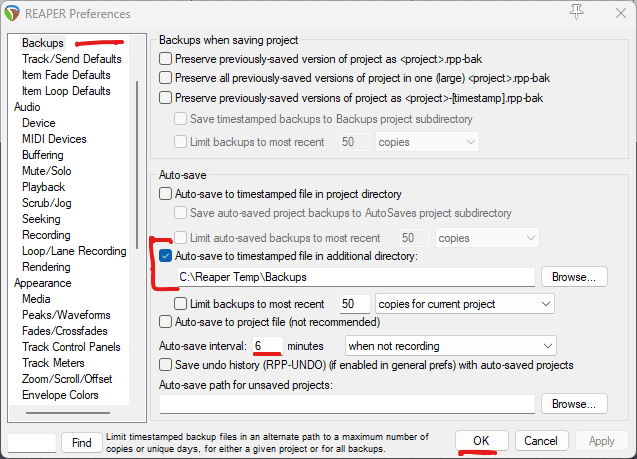
- 1In 'Preferences' select, 'Backups'. Check the 'Auto-save to timestamped file in additional directory' and choose the folder where you want to store store the backups.
- 2Select the 'Save undo history (RPP-UNDO) (if enabled in general prefs) with auto-saved projects box' and choose your path.
Temp Directory
If you want to do it like Uncle Keith does, create a directory on your main drive called Reaper Temp. Under that, create two directories -- Backups, and Peaks. Choose those as your file paths for, well, you know -- backups and ReaPeaks files.
Media Directory
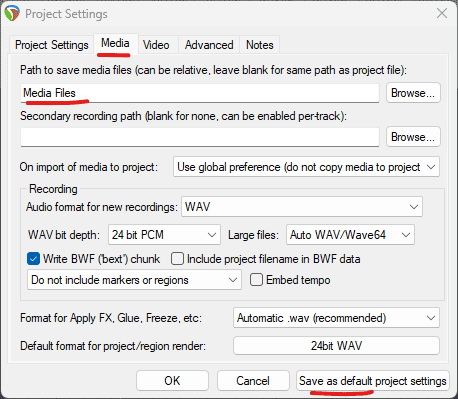
File > Default menu: Main file > Project settings > Menu tab. Type in the directory where you want your media files stored. I have 'Media Files' there 🙂
Automatic Backup
Yeah. Turn that on. You'll thank me later. Set it for how often you like. 5-10 minutes is normal. 'Auto-save to timestamped file in additional directory' is what you want.
Other Backups
I use Google Drive to back up all my important Reaper stuff. You don't have to use Drive, but you should def back up. It's not fun to lose hours, or years of work due to an inevitable hard drive failure.
I back up my song projects folder, and my Reaper preferences folder. I have it tuned off while I'm working, but at the end of the day, or if I take a break, I fire up Drive and let it back up any new or changed files.
Two backups is not a bad idea. Store copies of your song projects on an old hard drive and keep it at your weird Uncle Louie's house.
Optimizing Your Computer For Recording
Your computer might work just great for recording audio, without any changes. But computers tend to have a lot of processing going on in the background. Virus scans, file indexing programs, or calls to a network may interrupt or delay other processes going on.
For most computer tasks, that's not important. Who cares if there's a 3 ms delay between when you type "Please take me back" followed by a crying emoji, and when it shows up on the screen in your email program?
But for audio, we need a cohesive stream of uninterrupted data. It's not that much data (USB 2.0 can handle dozens of tracks coming in at once), but it's fast, and it has to come in uninterrupted, and in exactly the right order.
Reaper might work perfectly fine on your computer without any changes. But if you notice any dropouts in your recordings, or if you just want better performance, check out the following.
Turn it back on, when you finish.
Setting Up Reaper: Conclusion
Big picture, here's the process . . .
- Download the manufacturer's driver for your audio interface, and install it.
- Set preferences in Reaper to recognize the interface.
- Set up file preferences in Reaper for organization.
- Hook everything up -- audio interface to your computer, plug speaker cables into the back and into your speakers, plug your mics in, etc.
- Fire up a track, record arm it, set the input and level, and go to town!
Enjoy!
